Friday, May 28, 2010

My Digital Studio


I decided it was time to order My Digital Studio from Stampin' Up! I have never used any scrapbooking software before. Loading the program on my computer was super easy. I do wish the software came with an instruction manual, but there are lots of resources online to help.

I spent about an hour creating this first layout from a blank page. I love how it turned out. I like that the mats around the pictures are color matched to my son's coat.

The program comes with lots of goodies. I also like that Stampin' Up! comes up with lots of fun downloads to add to the program. I can't wait to purchase more of them when my budget allows.

Tuesday, May 18, 2010

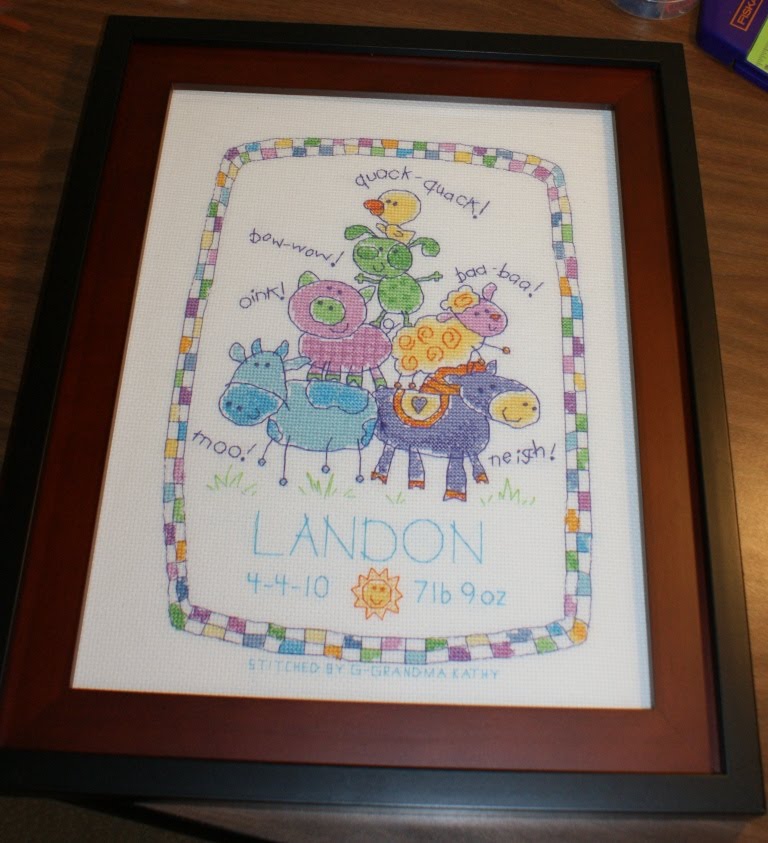
How to frame a cross stitch

I have worked at three custom frame shops in my life. Part of my responsibility was to frame stitcheries. If done right, they will last for generations. If done wrong, you'll be lucky if they make it 20 years....

Having anything custom framed can break the bank. Having the stitchery stretched and prepped is a very expensive part of the process.

So, hopefully this tutorial will make sense...

Supplies:
stitchery
frame
foam core (that poster stuff that has foam in the middle)--acid free if you can get it
straight pins
double sided tape
glazing points (they keep the stuff in the frame)
hanging hardware
paper sack or butcher paper


Here goes...start by selecting a frame that your stitchery will fit in. I bought mine at Walmart. I liked that it had a wood insert that could be placed behind the glass so that the stitchery wouldn't touch the glass. (sorry no picture)

Next, cut a piece of foam core that will fit into your frame. If you can get acid free foam core use it!

Make sure that the foam core fits into the frame with just a little wiggle room.

Next, center the stitchery on the foam core. This can be a tricky step. I usually start by placing a pin into each side and the center and then folding the extra fabric around and measuring to make sure it is centered.

The next step is the painful step. You will pull the fabric taut as you go along each side. Place a pin every half inch or so. Place them straight down into the foam core.

A look at the top edge with all the pins in place. Once you are happy with the placement of the pins use the flat end of a pen (or something similar) to push the pins all the way in flush to the foam core.

Next, I like to use double sided super sticky tape to adhere the extra fabric to the back to the foam core. I NEVER cut off the extra just in case it needs to be reframed in the future for any reason.

Then I place it in the frame to make sure it fits.

Then I turn over the frame to make sure that it is centered the way I want it to be.

This is the wood insert that came with the frame. A mat would work the same way. Since it is wood, I didn't want the wood to actually touch the stitchery because it would ruin it.

To solve the "I don't want the wood to touch the fabric" problem, I used my handy dandy glue runner that I use for scrapbooking and adhered some acid free paper to the wood to protect the fabric. Where the paper wasn't long enough, I just overlapped it (no picture, sorry).

These are glazing points. They are found in the framing section of most craft stores. You just may need some way to secure the stitchery in place. The backing that came with my frame no longer fit properly because the foam core was too thick.

Just place them flush. The pointy end sticks into the frame. There is a tool to set them, but I always just use a flat head screwdriver.

For a nice finished look, I usually use butcher paper, but didn't have any, so I grabbed a paper bag and cut it open so that I could use it for backing.

Using the same handy dandy glue runner for scrapbooking, I ran adhesive along the edge of the frame and then placed the paper securing it as I went along. Then I used a razor blade to trim along the edge to give it the finished look that you get from most frame shops.

I then found the center of the top edge of the frame and marked it. If the frame is 11x14 or smaller you can use a sawtooth hanger. I like the nail-less kind. You can usually find them along side of the other framing hardware. They are truly worth the extra money.

It was a very narrow frame so the sawtooth barely fit. If you can, don't place it quite so close to the top edge.

Then, hang it on your wall and enjoy it!

If you have questions, please leave a comment and I'll try to answer them.

Sunday, May 9, 2010

One Sheet Wonder

Here are the cards for the One Sheet Wonder that will be coming up on June 5th from 10 am to 2 pm. The cost is $10. Space is limited, so sign up as soon as possible to secure your spot before it's too late!

Thursday, May 6, 2010

New Stampin' Around Build-a-wheels


I LOVE the new build-a-wheels. Enjoy the two cards I made using the two styles offered in the new summer mini catalog. If you want to order them--visit my Stampin Up website anytime...

Sunday, May 2, 2010

Ribbon Slider Card

I was watching YouTube last night and found a tutorial for a ribbon slider card. It is super easy, but the insert doesn't slide back in very well. I think it would work better with satin ribbon. I can't wait to make more so that I can perfect the technique so I can teach it to others!

Wednesday, April 21, 2010

April Club Projects

Since Easter was in April, I decided to do an Easter layout for club this month. I am still waiting for a stamp set (thanks for letting me borrow it Jen) that I need for the finishing touches. I just couldn't wait to post it because I think it turned out SUPER CUTE! I found a tutorial here for the bunny.
I wanted the technique to be embossing this month. I knew I needed to keep it simple. I LOVE how it turned out. My club members will be able to choose from different greetings to fit their needs. I can't wait to share one of my favorite techniques with my club members!

Sunday, April 18, 2010

Buttah's Play Room

We turned the bedroom downstairs into a playroom for our son. I am excited to have the majority of his toys in one room. One wall has numbers 1-10, the next wall has the alphabet, and a third wall has shapes. All are vinyl, so they will come off without effort when we move. He has his fort, a craft/coloring table, a car mat, and his toy box. I also have the TV set up so we can watch kids movies. I still need to make a curtain for the window and a curtain for the closet. We don't have a door on it and I will be putting a gate up to keep him out of the closet and I want to hide the gate with a curtain. I hope we get lots of use out of it before we move.

Thursday, April 8, 2010

Stampin' Up Color Renovation

Stampin' Up has decided to change the core colors to meet with current market trends. Here’s a break down of what you will find in the new color families.

  • 4 new color family names: Brights Collection, Neutrals Collection, Regals Colletion, and Subtles Collection
  • 5 new colors: Marina Mist, Daffodil Delight, Cherry Cobbler, Cajun Craze and Early Espresso
  • 7 returning in-colors: Baja Breeze, Pink Pirouette, Riding Hood Red, River Rock, Tangerine Tango and Wild Wasabi
  • 3 current in-colors: Rich Razzleberry, Melon Mambo, Soft Suede
  • 25 returning current colors

For a total of 40 standard colors.
So are you ready for the next news?

Next year we will have 5 new in-colors which will last for 2 years. Each year we will continue to have 5 new in-colors to play with. So in 2011 we will have 10 In-Colors at a time. I love the In-Colors and I’m so excited that will be around for 2 years now.

YES that also means some of our current colors will be going away. I’m excited to let you know now so that you will have time to stock up on these colors before they are gone. They will retire at the end of June. Keep in mind that anything using these colors such as paper, products and accessories will also retire so stock up on your favorites now before it’s to late.

Now is a GREAT time to have a party and earn some of these colors before it’s too late.

Wednesday, March 31, 2010

Rebecca's Workshop

Rebecca held an in home Workshop for me yesterday. It was success! I am glad that she was willing to let me come share my love of stamping with her friends and family. She did well and earned a lot of free product! YAY for workshops and Stampin' Up!